Thursday, March 18, 2010

TREASURES & TRINKETS THURSDAY!!! Cottage Kitchen Dissection- Always room for improvement!

It's time for our weekly Treasures & Trinkets Thursday! You know the drill..........
1. Post something you love (just has to be something you own)
2. Link back to me (out of the kindness of your heart) :)
3. If you know how, take my button with you.
Okay, lets go!

For the past few years my grandpa has started building different things out of wood. He's done little cars and trucks, magazine stands, wheelbarrows and wishing wells.......but THEN, he broadened his horizons, and made me a table. It's a sweet little side table made with love. He put on curvy little legs and a nice bottom shelf........but what he didn't put in it was anything that stood out.......you know, character. I wanted to use it in my house, but it needed something........hmmm, what? I had an ah ha moment when my mom gave me some paintable wallpaper pieces she had lying around the house. (of course the ah ha moment was inspired by my mom using it on something else in the same way! lol) :-) Anyway, I wallpapered the front apron of the table and then painted the whole thing out white. I added a lovely little crystal knob for looks........there's no drawer there, so it's just for show, but who cares right! :)


Now the little table has character and holds a very special place in my heart since it was made by my grandfather's hands. :) It sits in front of two windows at the end of my kitchen, flanked by the two little chairs I made over in an earlier post. What a nice place to sit and take in the morning sun and look at the flower bed just outside the window.......... I'm lucky to have this sweet little table and my grandpa too!


Tune in tomorrow to see what I have on my little table in my cottage kitchen! :)
I've linked up to
Fireflies and Jellybeans Show off your stuff party!
Favorite Things Friday at a Few of My Favorite Things


Blessings

Wednesday, March 17, 2010

Cottage Kitchen Dissection-SITTIN' PRETTY PARLOR CHAIRS RE-DO

Cottage Kitchen Makeover part 3 or was it 4, ....oh, who's counting?! :)
I do wish when I was re-doing this project I had known I was going to start blogging so I would have some before pics. :-/ Oh well, the after pics are cute as a button, so here we go! My mom gave me these two chairs a while back and they were rusty and the wood had rotted out. We both knew they would be so sweet with some tlc. First I took the rotten wood off the back and the seat and used it as a pattern to trace onto new plywood. A jigsaw and a few minutes of my time and new backs and seats for these two lovelies were born. :) Then I took a wire brush made for a drill (you know, it's round with little wire bristles all around, with a stem that mounts into your drill) and got off all the rust. I primed it with a primer made for metal and then gave it a good coat of white rustoleum paint. :)


My mom had this precious fabric of little girls playing for quite a while and she willingly gave up some for my chairs. (it matched my kitchen to a T!) I recovered the pieces of wood I had cut out with some extra carpet padding I had lying around, some batting over that and the lovely fabric, making sure to line up the pattern in the same spots for both chairs. Used my handy dandy electric stapler and attached the fabric to the wood! I trimmed out around the fabric in the back with trim and used screws to put the back and seat back into place. Walla! Two new chairs! I have these under my window at the end of my kitchen, they turned out just wonderful! :)


Aren't they just the sweetest things!!

Blessings
MELISSA

Tuesday, March 16, 2010

COTTAGE KITCHEN MAKEOVER....THE MAKING OF THE ISLAND!

I had several of you say you liked my kitchen island during my Cottage Kitchen Makeover. I thought I would tell you how it came to be. My aunt Chloe had given my mom an old porcelain top table just like this one...........


I pulled this picture from Ebay if you're interested in buying it and building your own island! (it's in PA, if you wanna pick it up. LOL) Mom didn't really have a place for the table, so it got handed down to me. I have always wanted an island, but our last house was too small, so when we moved into this house I KNEW I would get my island. Our kitchen had the perfect, wide open spot in the middle just calling for an island...now I just had to find one. (Insert table here.) :) The table would have been a cute island all on it's own, but I wanted it to be a smidge higher than it was and also wanted some extra storage, so I decided to build around it and to make it what I really wanted. I first started by measuring how big the top was, I wanted the base to measure the same as the top. After measuring I cut out MDF (medium desity fiberboard, for those that aren't familiar with it is an engineered wood product) to the same dimension as the top. I made sure the table legs were the same distance from the outside corners of the base and screwed the table legs to the base from underneath. (I just flipped the table on it's top and laid the bottom piece of MDF on the legs to get to the bottom to screw it on.)

Here's a pic of the base screwed to the original table legs.


I did have to do a little thinking before I put all this together. I had gone to the store and found a cabinet door that was the appropriate height...........I found the door first so I would know how wide to make my inside compartments. (hence, the width of the cabinet door determined where I would place my inside compartment wall.


Here's a pic of the door....I just screwed the hinges directly into the old table leg.


But before the door was attached I had to build the inside and outside walls of the island. I cut the side and front pieces from MDF as well, to sit inside the old legs and apron and just screwed it in place through the bottom of the island and also used the apron to screw into. (the pieces came above the apron inside) This held it firmly in place on all three sides. I cut out beadboard panels and applied them to the MDF sides and front. I used beaded screen trim (that was the name) to trim out around each panel that I put on and also around the base plate.


I built the inside wall the same way, screwing it from the bottom base and also through the MDF back that I put on. I put the inside wall in BEFORE I put the beadboard panels on the outside, you don't want to see the ugly screws and the beadboard will cover those up. :) I also built the dividing shelf the same way...........cut it out, and screw it in from each side. (again before the beadboard on the outside.

This is a pic of the shelf..see where I screwed it in place through the middle wall?


I bought two baskets that slid into these sections....I found the baskets first, then put the shelf in place according to the heights of the baskets.


Do you see the little strip of wood at the top of the back panel? We put that there, just so we would have some extra support from the outside, so it wouldn't push in and to have extra places to screw the MDF to. (I'm sure it would have been fine without it because the MDF was so thick, but I have three boys so we were trying to give it extra umph!) I am convinced boys can tear up anything!!!!


Here's the beaded trim up close.


This is a picture of the front of the island. OH, I forgot to tell you that you have to remove the front of the drawer from the drawer itself because you can't have a drawer inside the cabinet for all the walls and shelves. I just screwed the front back on so it would look like it had a drawer. I didn't want a hole there! LOL


This area of the old apron, above where the baskets go, looked very plain so I put some trim in a rectangular fashion and made a faux drawer there. I screwed on a crystal knob that matches the ones I used on my kitchen cabinets. Looks so much better than the plain, empty space that was there before.


After everything was put together, we flipped the whole thing over and installed four rolling caster wheels. (easy to move around and clean under!) After than, I primed then painted the whole island bottom with a nice bright white. I also added the antique glass towel bar on the one end. (mom gave me that too, THANKS MOM!!) My mom reads my blog too. ;)

That's about it! It sounds a lot more complicated than it actually was. If I can do this, YOU can do this!

Here is a pic of the glass towel bar in place with my lovely tea towels I got on clearance from Kohls. I LOVE pink and green! :)


Here's the basket in place. I used the top basket for all my bread and buns and the bottom basket is for chips and cookies. :) I keep large cereal boxes and sodas behind the door. It is amazing how much this island can hold! and to think it went from a shabby old table, to a sweet little island. I love to repurpose things, especially when they started out as an old family piece like this one.
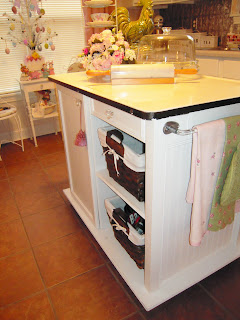


Hope this inspires you to go transform something so so, into something sweet and spectacular!
I joined Get Your Craft On at Today's Creative Blog, It's so Very Renovated at It's So Very Cheri and White Wednesday over at Faded Charm.


Build{hers} club Button


Blessings
Missy
MELISSA

Monday, March 15, 2010

Cottage Kitchen Makeover Dissection-TOILE WALLPAPER

I fell in love with this wallpaper the minute I saw it! You'll never guess the name of this paper..........


It's called Victorian Charm. :) I think that's very fitting for My Cottage Charm blog, don't ya think!? This paper is made by The Warner Company and is a pastel, powdery pink on a lovely cream background. I'll give you one guess where I bought it..... EBAY! :) I know, I know I'm addicted....I wonder if there's a 12 step recovery program to get off Ebay? LOL

Here's a little peek of an area that's papered....I couldn't exactly show you every area. :) This area is one I didn't show you in my Cottage Kitchen Makeover (a little surprise for you)......stay tuned to a later post, there's still more you haven't seen. (tease tease)


This was a plain wall when we moved. (A plain ORANGE wall....YUCK!)

YIKES! I like warm colors, but trust me this was not pretty in real life....we called it rotten squash!

I installed the two upright, fluted columns. (which are actually pieces that are made for the inside side openings for garagedoors) :) My husband and I installed the beadboard...it's painted Colonial Cream from Walmart.


I came back after I had done the "columns" and built the little shelf above it with a piece of leftover baseboard. It worked really great because I put the pretty side down and the back had a groove already in it which worked great for holding plates in place. (well the groove and some sticky tack) LOL. I also added the little trim piece under the shelf and mitered the corners to go around the column...to make it look like a capital.


Here's a pic of the bottom of the "column", we just put it flat against the wall and put baseboard inbetween the two columns. I put little corner pieces of molding on each corner. (you can get them at Lowes) We finished the whole thing off with a piece of quarter round. I need to give it one more coat of paint.


And here's the finished product one more time!


I just LOVE it! So much better than rotten squash wouldn't you say?! :)

I am linking up to Show off Your Cottage Monday at the House in the Roses. :)
Blessings


MELISSA

Sunday, March 14, 2010

DISSECTING MY COTTAGE KITCHEN MAKEOVER- "STAINED GLASS" WINDOW


Okay, many of you have asked to see parts of my kitchen makover up close, so I thought I would do a short "series" on dissecting my cottage kitchen. The first thing I'll show you is the "stained glass" window leaning inside my regular window. When we lived in our old house we replaced our old aluminum/vinyl windows with nice energy effecient ones. I had done this stained glass window treatment on one of my windows and couldn't bear to see it thrown away in the trash. Sooo.... me, being the pack rat that I am, had to figure out a way to get my pretty window out of the casing. It took some work ripping off that old vinyl and aluminum, but I salvaged my pretty little window. :) The stained glass is not real stained glass, it's a product many of you might already know about called Gallery Glass. Gallery Glass is put out by Plaid Enterprises and comes in a liquid form in bottles. The black "leading" can either be made with liquid leading or you can buy it pre-formed and self adhesive, that's the one I used. You get much straighter lines with the preformed and it looks more professional. ( and you don't have to wait for it to dry to use it!) :) You stick this stuff on the lines of your pattern and cut it with a single edged razor blade........it's really easy to work with.
I used a pattern from one their books, but you could use any stained glass pattern you wish. I just enlarged mine until it fit the panes in my window. You tape the pattern behind the glass and go over the lines with the self adhesive "leading" on the other side. I used the clear gallery glass for my window, but you can also get it in some very nice colors. I was just trying to go for the vintage glass you see in old victorian homes. :) The clear gallery glass comes in liquid form in a big bottle.....like this.


You can see some small circular pieces that look like they have bevels, that was from using a plastic bevel tray they also sell, but you don't have to use that at all, just squeeze the liquid into the areas made by the lead in circular motions and let it dry. The clear goes on milky white, but dries completely clear.

I am eventually going to put some eye screws into the top of the window and hang it in my regular window instead of having it lean..........haven't had time to get to some of the little things yet. :)
Well there you have one "close-up" of my cottage kitchen. Stay tuned for more!! :)
I have linked up to Make it Mondays at Cottage Instincts
Have a Blessed Day
MELISSA

Thursday, March 11, 2010

COTTAGE KITCHEN RE-DO..HOW TO PAINT YOUR KITCHEN CABINETS-! BEFORE AND AFTER!!

I have been working on this post for a while now. It's the before and after (and how to) of my kitchen cabinets, but you can see the before and after of the whole kitchen in the pics. :) Let me say we started with these.......UGH! (not my honey, he's definitely not an UGH, he's my sweety!)


Someone had taken some kind of gel stain and smeared (for lack of a better word or technique) all over the kitchen cabinets. Well, not all the kitchen cabinets, there were two with nothing on them........I guess they ran out of stain. ?? :-/ ANWAY, we decided it was time to tackle that mess. Instead of sanding down all those cabinets we used this......


This one is called paint deglosser, but the one we actually used was called liquid sandpaper. (pretty much the same thing) It works like a charm! :)

We primed the cabinets with Zinser Primer. (sorry, no picture of the primer, I used every last drop) :) I can honestly say that was the stinkiest, thinnest stuff I've ever used, but it did work. If you have a primer you like better, then go ahead and use it...this stuff was like water....but like I said, it did the job just fine.


I was going to show you the front of my paint can so you could see the name of the paint, but.....it was totally covered in white paint, do you paint like that too? By the time I get finished you can't see the label anymore! :) I did manage to get a couple of shots to show you what kind we used. It's from Sherwin Williams and it's called Pro Classic Bright White. It goes on like an oil based paint and self levels to a nice hard, non yellowing finish. I love this stuff!


Here's the back of the can....I actually didn't paint over this part!


Okay, here we go.....here's some more before pictures. These two photos were taken through the window BEFORE we got the keys to the house.... yes, I peeked in the windows almost daily to decorate in my mind. :) If you'll notice the ceiling's, the previous owners took everything when they moved, even the light fixtures. That ceiling fan in the living room was the ONLY light fixture in the entire downstairs! (but don't get me started on everything they took......like all the appliances! Except that microwave they couldn't figure out how to get off the wall!) You need to take note of the cabinets, backsplash and wallcolor. :) (cause it's gonna change!!!)


This picture was taken after we moved in and put in new appliances and LIGHT FIXTURES! LOL

This is a pic of the cabinets with a straight on view. Please pay close attention to what we did to the upper cabinets. (you're gonna like it, I guarantee it!) LOL Also, just so you know, I had to move the cabinet by the door, over by about 3 inches. The stove area wasn't centered under the microwave........who does such a thing!!? It's centered now.....I'm too OCD to leave something like that! :)


Before we started painting, we decided to do something cool to the top doors on a couple of the cabinets. We took a router and cut out the inside panel, it wasn't too hard either. We just routered close to the edge and then the part of the panel inside the groove of the door pulled on out. Then we set the router to a more shallow depth and went around the inside of the door, leaving the outside untouched. This was so the glass would have an indention to set into.

Here a picture of the inside of one of the doors before glass. (actually this is a finished door we didn't put glass in, that's why it's painted. I just wanted to give you a before shot.) :-D


Here's a pic of the inside of a door panel after we routed it out and put the glass in. We painted the doors BEFORE we put the glass in, then we used a clear silicone to hold the glass in place.
Notice the little lip we left in tact on the front of the door......you can see it if you look through the glass. This is obviously the back of the door your looking at.


Here's a pic of the upper cabinet with the glass in place! :)


These are the knobs I chose. I got them from Ebay! I LOVE LOVE LOVE Ebay! :) (if you read this blog, you probably already know that! LOL)


Here's another shot of the two upper cabinets we put glass in, these are the only two that got glass. I thought it gave it a look like matching built in hutches. :)


Inside each of the cabinets I took out the shelves and cut out sheets of beadboard that fit perfectly into the back of the cabinets. I didn't attach them with anything so I could take them out and repaint them at a later date if needed......when the shelves are replaced, they hold the back in place perfectly! I painted it a lovely powdery, pastel pink...........what other color is there?! :)


Here's the other cabinet with glass.......I use it for some of my favorite dishes and glassware. Oh and my antique glass rolling pin filled with pink rose potpourri. :-)


Here's the backsplash we put in.......you can find the post for the backsplash here. The backsplash changed the kitchen almost as much as painting the cabinets. Go back and look at the photos to see what was on the wall BEFORE the tin backsplash. EGADS, not very cottage-y! The total price for the backsplash was about $110-$120.00 at Lowes. You can find it in the cabinet department.

Here's some more backsplash pictures.


We also got new countertops..........I picked a nice neutral gray color. Wish we could have gotten a gray granite, but the budget didn't allow it this time. (something we can do later when funds allow)


AND here's some final photos of our finished kitchen! Yay, hooray, yipee.....can you tell I'm a wee bit excited it's all done. Well, I'm sure I'll tweak it some more, but the major stuff is complete!

If you like this island and want to know how to make it, go here.


I'll be blogging about some of my things in the kitchen individually later, just couldn't wait to show you the overall shots and the how to part!
I'm linking up to My Romantic Home's Show & Tell Friday & Ms Mustard Seed's Creative Blog  I was honored to be mentioned at the Cozy Little House Welcome Wagon Friday! Thanks so much! I've also hooked up to Met Monday at Between Naps on the Porch & Make Your Monday at Twice Remembered & The DIY Showoff & The Lettered Cottage room re-do.
Have a blessed day!
Melissa
Related Posts Plugin for WordPress, Blogger...