Showing posts with label blogging friends. Show all posts

Wednesday, February 6, 2013

It’s My THIRD Year Bloggiversary!!

Hey ya’ll! :0)

As of February 4th, I have been blogging for THREE years!

anniversary

In some aspects, it doesn’t seem possible it could be three years since I started this blog, but as far as friends go, I feel like I’ve known some of you forever!! (and that would be forever in a good way!)  
Smile

I’d like to take this opportunity to thank each and every one of you who takes the time out to read what I have to do say, to see what project I’m doing, or to stop and pray for my family when “not so great” things are going on.  I can’t begin to tell you how much you mean to me.  You are SO special!

Since I’m on here, I thought I’d give you all a little update about my hubby’s surgery.  He had back surgery on Jan 22nd….it’s called anterior discectomy and fusion.  They basically made an incision about three inches long, on the front ride side of his neck.  They went in, through the neck, and pretty much took out the herniated disc, put in a bone and connected the two vertebrae together with a plate and screws.  We never dreamed it would be as difficult a recovery as it’s been, but praise God, he’s doing so much better now.  He had a terrible time swallowing, and would get choked on just about everything he ate…he even got strangled on his own saliva, but he’s not doing that as much now.  He is getting stronger everyday, and I want to thank you all for your wonderful positive energy, thoughts and prayers……..it has all been such a blessing!  I take him back to the doctor on February, 25th and hopefully they will say everything is perfect and he can go back to work. (although I have thoroughly enjoyed having him home with me!)    We will be having our 28th anniversary on Valentines day, and it will be nice having him home then!  Hopefully he’ll feel like getting out of the house for a nice dinner, but I don’t think there will be any dancing! lol  (not like we ever go when we are healthy either! ha!)
Smile

Just wanted to share what’s going on around here, and again, say thank you for reading my blog, and being my friend! I love you guys!

Blessings
Missy

Tuesday, May 8, 2012

Where I Put My Painting…

You all remember the lovely painting my friend Cindy painted me as a surprise?  Well, I finally figured out where I like it best.

rose oil painting

I placed it in my kitchen window, in front of my stained glass and under my chandelier.  I thought since I spend so much time in the kitchen, it would be a perfect place, and it is….I smile every time I go in the kitchen now.

oil painting

Isn’t she lovely?! My kitchen wallpaper has the same pink/blush tones as the painting. I can’t tell you what it meant to me when I received this precious painting in the mail.  Do you know Cindy went through my blog looking at my house so she’d know what colors would match!  She is SO thoughtful!

rose oil painting

So thanks again Cindy for my sweet little painting….she looks like she’s always belonged in my kitchen. :O)

chandeliers in the kitchen

I would like to frame her….but I’ve never framed a real painting on canvas before. Does anyone know how you do that?

I’ll soon have an update on my window seat! 
HINT: I finally have it to the point where I can sit on it!   Yay!

Have a blessed week!

Missy

Wednesday, March 7, 2012

Guest Post from Amy at Mod Podge Rocks..

Hey Everyone, I’m so excited that Amy, from Mod Podge Rocks, is guest posting here today! Amy has an awesome blog with so many craft and DIY projects it’ll make your head spin! (in a good way!)  Let’s see what she has for us today……here’s AMY!!

This is Amy from Mod Podge Rocks, so pleased to be here today!
I have been blogging for almost four years at MPR, and I am (as you can guess) addicted to crafts and DIY. I love creating, but I also love writing. I co-own Decor Hacks with Heather Mann, and I contribute to Babble.com's The New Home Ec .  Not to mention that I have a new book coming out this June called Mod Podge Rocks. You could say I keep busy.

I hope you enjoy my photo block. I made it with bright colors and papers because that's what I like, but you can customize it to fit your decor. Here's how I made it!

mod podge rocks

I love capturing memories through photographs, and I particularly like interesting ways of displaying them.  Regular frames are nice, but photo memory blocks add a wonderful touch to your home décor – and you can get very crafty with them!  Consider using a photo memory block to decorate your child’s room or you desk at work.  Here’s how I made mine.

Wood Memory Block – mine is a 6” square
FolkArt Acrylic Paint, coordinating colors – I used Lemon Custard, Hot Pink and Yellow Citron
Mod Podge Matte, 8 oz.
Scrapbook paper, 1 sheet per canvas – I used K & Company’s Berry Sweet papers
Embellishments – I used K & Company’s Berry Sweet collection, as well as a few buttons, paper flowers and rhinestones from my stash
Craft Glue
Flat Paint Brush
Craft Knife and Mat or Scissors
Ruler

mod podge rocks

Start by trimming your paper to fit the sides of your wood block.  My craft mat has a ruler guide so I was able to quickly measure and cut a 5 1/2" square – I wanted to leave a 1/4" border around all side of the paper so that I could see the paint.  I cut six squares out of three sheets of paper, choosing coordinating papers so that they would look good together.

mod podge rocks

Paint your block with the acrylic paint and flat paint brush.  You don’t have to paint the entire side of the block since you’ll be applying paper over it; just paint the edges.  I applied three coats to each side.  Allow to dry.

mod podge rocks

Now that your wood block is dry, apply the Mod Podge.  Use a medium layer and coat well. Apply the paper to the center of the block and smooth it down thoroughly with your fingers or a brayer.  If Mod Podge comes out the sides, that is fine – simply wipe it away with your brush.  Apply the papers to all sides of the block and allow to dry for 15 – 20 minutes. 

TIP: I applied Mod Podge to the corners and edges of my paper before smoothing down – this helps since the edges are the first thing to dry!

mod podge rocks

Next add a coat of Mod Podge on top of the paper.  Allow to dry and add a second coat, covering the whole block.  The fun part is next!

mod podge rocks

mod podge rocks

Now add the images and embellishments with craft glue.  Get creative!  I planned my picture sizes first and printed them all out before I glued anything down.  You don’t have to fill the entire block with one photo; check this finished side out:

mod podge rocks

You can also do a few photos on one side and add embellishments around them.  I had so much fun!  Here’s another finished side:

mod podge

Add photos and embellishments to all sides, except for the bottom and the top (unless you want to).  Now I have something for my desk at work to remind me of my sweet dogs when they are at home and I’m in front of the computer.

Thank you Missy, for having me today! Please feel free to visit me at Mod Podge Rocks anytime, or follow me on Facebook  or
Pinterest

Have a great day!
Amy

THANKS Amy for sharing such a great craft with us, it was such a treat to have you on My Cottage Charm! Why don’t you guys go over and check out some of Amy’s other crafts on her fabulous blog, Mod Podge Rocks! 
Missy

Wednesday, January 11, 2012

A “SPECIAL” Delivery…


envelope

Well today was a wonderful day!
This morning I heard the doorbell ring and looked out my bedroom window to see our mail lady, Darla, standing at my front door.  I opened up the window and yelled down for her to just leave the package she had in her hands because I was a  mess.…still in my pj’s, no make-up and hair in a sort of ponytail. (you know the half falling down kind) :-0

I went downstairs and grabbed my package out of the rain and got all giddy when I saw who it was from!  Cindy, from Cindy’s Fractured Fairy Tale!  Now if you don’t know Cindy, you’ll have to hop on over to her blog and see the amazing talent this gal has!  Anyway, I ran upstairs and plopped on my bed to rip open the large envelope. (yep, it felt like Christmas again!)

Here’s what was inside the envelope……

how to wrap a pretty package

Isn’t it a lovely little package…all tied up with a purple bow and vintage earring.    Just so pretty.  I grabbed my camera to take a couple of shots because I just knew I would want to remember what special care she took in wrapping my surprise.  And OH, what a surprise it was!

vintage earrings

Just look at what was inside that pretty little package all tied up with string….
This is now one of my favorite things!…..

Cindy's Fractured Fairy Tale

Yes, she sent me a painting that SHE painted just for ME!  I’m always telling her what an amazing artist she is, and she got on my blog and looked around to see my house colors and actually painted me this beautiful picture.  Yes…I cried.    You blogger friends sure know how to make a gal cry!

When Linda, from Itsy Bits and Pieces, sent me those beautiful ornaments for Christmas I cried…
Remember these??… Beautiful and so special!

vintage christmas ornaments

When Patty, from Lemon Lane Cottage,  sent me the beautiful baby blanket she handmade for Sweet Pea, I cried….

beautiful

Either I’m getting mushy in my old age, or you gals are just amazing. (I think it’s you gals are just amazing!)

Now back to my beautiful painting!  It goes in so many rooms in my home that I’ve just been walking around and around looking for the perfect spot.  I still haven’t settled on where it’s going to hang, but it’s just perfect….in every little way!

beautiful rose picture

I promise, these pictures just don’t do it justice….It’s so deep and realistic.  (and I can still smell the paint…it’s so fresh!)

picture of a rose

Cindy is SO talented..you just have to go over and see the amazing cows and sheep she’s painted.  They’re so light and airy…almost misty. :0)  I’m tellin’ ya, she’s good!
Look how good my painting goes with my throw I just got from TJ Maxx…it looks so pretty with the pink.  See why I’m having such a terrible time trying to figure out where to put it…it looks good EVERYWHERE! :0)

the perfect rose

Thank you Cindy, from the bottom of my heart….you’re such a blessing and a joy to have as a friend!

Love you Cindy, and ALL my blogging buddies. I just can’t imagine if I had never started this blog…oh how many wonderful relationships I would be missing out on!

I am blessed.

Missy

Wednesday, December 28, 2011

Favorite 2011 Posts!

I thought I’d do an end of the year wrap up and hit some of my favorite posts from 2011.  My ALL TIME favorite before and after is my…

LAUNDRY ROOM
Before:

How to decorate a laundry room

After…..

laundry room makeover

laundry room ideas

I just never get tired of looking at my laundry room before and after pics! I still LOVE my laundry room!

Then there were the chairs from Target my hubby bought for me last Christmas, but I didn’t re-do until sometime last summer…

TARGET CHAIR:
Before:

target

After:

how to upholster a chair


I really liked this tutorial because it was so cheap and easy and made such a HUGE difference in my cottage kitchen. :0)

CABINET FEET TUTORIAL:
Before:

how to make cabinet feet
After:

cheap cabinet feet


The next tutorial after pics just amazed me…looks like a totally different space! LOVE it!

DOOR HEADER TUTORIAL:

Before:

how to build door headers

After:

door headers


This before and after was SO easy and made such a HUGE difference in my boys bathroom….don’t know why I waited SO long to do it!

MIRROR MOLDING:

Before:

how to add molding to a mirror

After:

how to add moldings to a mirror


This makeover took some serious time and effort, but it was really worth it…it still looks like the after picture almost a year later….so I KNOW it was a good makeover! lol

PANTRY MAKEOVER:

Before:

pantry makeover

After:

how to organize a pantry

pantry organization


I got my new camera in 2011 and had to have a cute cover for that plain black strap…you KNOW I had to make it more girly! lol

CAMERA STRAP TUTORIAL:

Before:

how to make a camera strap cover

After:

IMG_1359


This is my boys linen closet in their bathroom…it didn’t have any shelves in it when we bought the house, I remedied that situation!

CLOSET ORGANIZATION:

Before:

how to install wire shelving

After:

how to organize a closet


Then there was the old drawers from the 1916 house that was torn down in our town.  They went from this…

UNDER THE BED STORAGE DRAWERS:
Before:

what to do with old drawers

To this…
After:

under the bed storage ideas


I also got to attend a couple of fun blogger events this year too!

The first was a Bloggers June Jaunt with a great group of gals, but headed up by Gail Wilson, from My Repurposed Life.

Our whole group…

bloggers

Beckie and I in a Peddlers Mall in Indiana.

Infarrantly Creative


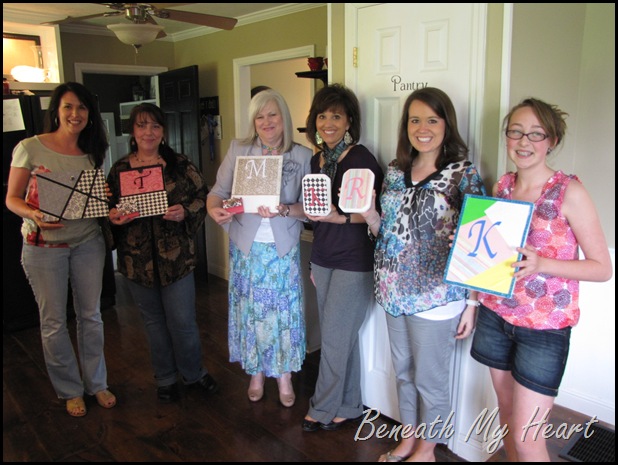
The next bloggers event was a craft party with Traci, from Beneath My Heart….we had a wonderful time!
This is me, Traci and Gail, from Gleanings from Gail.

beneath my heart

Here we are with our crafts…what a fun day!

beneath my heart


I would never have believed when I started this blog that I would have made so many wonderful friends.  There are many wonderful people out there in bloggy land and I’m SO blessed to know YOU! You guys really know how to make a girl feel special and loved. 

I truly hope you have a Happy and Healthy New Year!
Love you all!

Missy
I’m linking this post up to Rhoda’s year end post on Southern Hospitality.

Tuesday, December 20, 2011

Christmas Treasures Vignettes….

I have so many wonderful memories attached to almost every Christmas decoration I have.  I remember bottle brush trees from when I was little, so they just have to have special spots in my Christmas décor…..

cloche

This is a very simple vignette, but I wanted the trees to be the main focus….something so simple can be so pretty when they’re all grouped together under glass. My mom gave me the cloche’ many years ago, so the whole thing reminds me of family and Christmas from years gone by.

bottle brush trees

I have some of my most treasured antique ornaments behind glass. My mom gave me the old bowl, and it’s filled with well worn ornaments from times past…

aqua vintage ornaments

This next set of ornaments holds a very special place in my heart.  I received this entire set, including the silver compote, in the mail this year from an amazing blogger friend. She is one of the nicest ladies I’ve ever had the pleasure of “meeting”. I hope to one day meet this gal in person and hug her neck, but until then…you know who you are, and you’re a treasure among treasures and I love ya dearly!

sweet friends

Aren’t they just beautiful! I have to tell you, when I received the box in the mail, I opened it from the bottom and out came the silver piece first and I was just in love…I thought that was all that was in the box and I was thrilled!  Then I noticed more things…I started unwrapping the carefully wrapped ornaments one by one and sat there in my upstairs hallway and cried like a baby.  It sure was a wonderful surprise…..what a blessing! You know, all of you are blessings to me! Every time I see how many people read this blog..I stand amazed. Every time I read your sweet comments, it makes my day brighter and my heart swell…I really do love you guys!

old vintage ornaments

Old ornaments are one of my favorite things in the whole world and they’re getting harder and harder to find, so I treasure the ones I have so much! My favorites are the indented ones….especially if they’re pink!  Do these ornaments just scream my name or what!?!

indent ornaments

Do you all love old ornaments too, or do you prefer the newer stuff?  I wish I could go back in time and gather all the things I love from years gone by and bring them back with me to today…wouldn’t that be fun?!

Hope you all have a very Merry CHRISTmas and a blessed New Year!

Missy

Related Posts Plugin for WordPress, Blogger...