Wednesday, January 19, 2011

Pretty in Pink Pantry! Treasures & Trinkets


Today is Treasures and Trinkets Linky Party!
Link up something you love!
I’ll be linking up to Beneath My Heart’s

Organizing your Heart and Home Party. 
so pop on over there and link up your organized pantry or
Kitchen area and come back here and
link up something as well!
Let’s have some fun!


DSCN4237

I’d like to introduce you to my nice, neat and pink Pantry, but first I have to show you the before pics! 

I live in KY and I have to tell you I LOVE my KY Wildcats basketball, but I don’t want the UK blue color in my pantry…
LIKE THIS….!!


DSCN4172


I think the people that lived here before us,
were going for a Mediterranean look,
but it’s just not me.
Here are a couple of before pics of my pantry,
just to give you an idea of what it looked like
before all my hard work!


DSCN4169


What a mess!


DSCN4170


DSCN4168

To start my pantry, I removed everything from it.
(boy, did that create a disaster!)


DSCN4183


I also went through and removed all
the expired items…
it’s a wonder I haven’t killed my family
with expired food!
OH MY!
(I threw away, about 10 cans of food…
this is the good stuff here!)


DSCN4185


DSCN4186


DSCN4187


After removing everything, I was left with this….

DSCN4188
Yuck!
OK, ya’ll see that hole up there in my pantry?
Well whoever built this house, thought it would be a great idea to put the main water shut off valve
??INSIDE the pantry! ???

Anyway, I had this gaping hole there,
and to top it off, it wasn’t even cut out
wide enough to get your hand on the handle to turn the water off,
So, here’s what I did.
I cut the hole out a little bigger to be able
to get to the handle,
then decided to build a door to
cover the opening…
I measured it out and found I needed an
8x10 door..
I had an epiphany!!


I figured if I needed an 8 x 10 door, why not
just use a picture frame that was that size!
I love it when my brain actually works!
Smile
Here’s the only 8 x 10 frame I could find around here,
and it fit perfectly!
(I know it’s a little fancy for a pantry,
but it was free!)


DSCN4196


I couldn’t leave it that color,
so I put my favorite 9 year old in the world to helping me!

See the blur of his hand..that boy is workin’!


DSCN4198


I’ll show you how I finished that off here in a second,
but next I primed all the shelves…..


DSCN4190


The inside of the pantry……


DSCN4191


and all the brackets….


DSCN4200


After all the priming was done, I painted it
all out in Colonial Cream…the same paint I painted
my entire kitchen with.
(if you’d like to see how I did my kitchen,
go here, here, here and here)
I wanted something different in the back of the pantry,
so I chose the wallpaper I did my kitchen in..
it’s called Victorian Charm…a soothing, romantic
pink and cream toile…


DSCN4205


I just measured the length of the back of my pantry, wet my paper and then booked it.
Booking is when you accordion fold your paper
so the glue sides are together and then you let it
sit for about 5 minutes to further activate the glue.
It looks like this….


DSCN4206 

Then I just hung the paper,
making sure it was straight in the corners.
I cut off the excess on the top and bottom
like this….


DSCN4211


I repeated that process with my second piece,
making sure to match the pattern with the first piece.

EASY PEASY and OH so Pretty!

After the shelves dried,
I bought some of this stuff in a creamy color.


DSCN4201


I just rolled it out and cut it to fit!
AH, clean and bright!


DSCN4203


Now to show you my little door, i.e. picture frame!
It went from this…..


DSCN4216


To this…


DSCN4221


I just put the piece of plexi-glass back in the frame,
cut out the pattern of the paper to match what was around it and put on a hinge!
Walla…a door!
Access to the water cut off,
but pretty to boot!
Now to install those shelves!
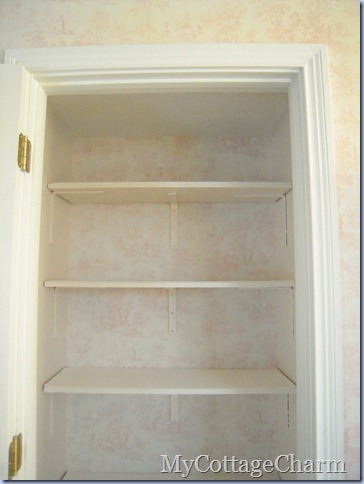
Tell me that doesn’t look better!!


DSCN4222


It was SO pretty, I didn’t want to put food back in it!
But I did…sigh.
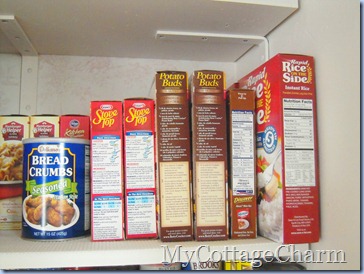
I put my food back in “like” groups…
i.e. pasta with pasta sauces..


DSCN4234


Then all my boxed items went together in one spot..
mostly rice and potatoes….
Can you tell we like our carbs around here?!
Surprised smile


DSCN4233


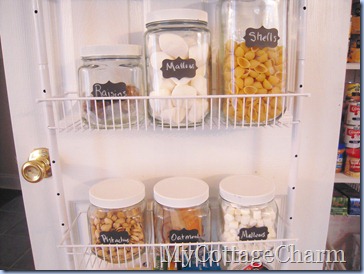
I did add these cute little jars from the Dollar General
to this shelf, to hold my potatoes, rice and pasta!
(thanks Traci for the heads up on these jars,
I LOVE them!!)


DSCN4286

All soups and beans went together…


DSCN4232


and then all my veggies! I did it like a grocery store,
they’re all lined up in rows, labels facing out.


DSCN4231


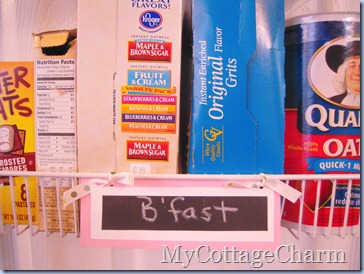
I also re-did the over the door hanger
on the pantry door…


DSCN4290


I added some cute tags I made and some
chalkboard tags I cut from Chalkboard vinyl.
(a GREAT invention!)


DSCN4288

DSCN4289

DSCN4287

Cute huh?!
LOVE that chalkboard vinyl!
Here’s a pic of my Pink Pantry AFTER…..


DSCN4292
 
The milk crates in the bottom, hold my tupperware.
SO, much cleaner and brighter than before!

One last time…just for kicks!
Before….


DSCN4169


And AFTER…


DSCN4291


I’ll be linking up my pantry makeover
to Traci @ Beneath My Heart

Don’t forget to go visit her and
then link up your favorite things here
and your organized pantry there.

Also linking up to:
Domestically Speaking's Organizational Party
POPP Party
Show off your stuff party
Transformation Thursday @ The Shabby Chic Cottage
Thrifty Decor Chick's before and after party
Visit thecsiproject.com


Hugs
Missy

Tuesday, January 18, 2011

The Mess Before the Organization!

You wanna see the mess I made getting ready to organize my pantry??
Here ya go!


DSCN4183


DSCN4184


It takes a mess to organize sometimes….
but stay tuned, tomorrow I’ll be showing you the
Before and AFTER of my pantry!

It’ll also be Treasures and Trinkets linky party, so be getting your goodies ready to link up
…just something you
love, or an organizational post!
OH, and I’m trying out Windows Live Writer
to write my blog now…
have any of you used it..
how do you like it?
It’s either try this, or buy a .com and
go to Word Press.
Thought I’d give this a shot first…
So far, so good!
I haven’t posted anything this week cause I
couldn’t get blogger to load pics…
this is SO much better!

(and thanks to Gail @ My Repurposed Life,  for
the phone call that helped me figure this Live Writer thing out!)
She’s such a sweetheart!
You guys have a great day!

Wednesday, January 12, 2011

How to install wire shelving- Boys Bathroom Closet Organization! Treasures & Trinkets

It's Treasures and Trinkets Linky Party TIME!
Link up something you love!
You know what I LOVE?
Organization!
Today I'm going to show you a place in my home
that not many people see,
but it drives me crazy!

Let me first tell you that we bought our house
repossessed, and the previous owners took
EVERYTHING they could with them...
even down to the closet organization systems!

We've slowly been working our way through the house
replacing all those, but this little closet
 was WAY down
on the list of re-dos...
until NOW!

So here is a pic of what the poor little closet
looked like before I started organizing!


I had purchased these clear drawers as a
temporary storage system for this closet
and let me tell you it wasted a LOT
of valuable space~!


See all that wasted space up there!!!


I decided it was time to tackle the situation,
and made a trip to Lowes.
(it's very dangerous to my wallet that Lowes
is only 2 miles from my house! lol)

I purchased all the items below:


I got 20" deep wire shelving
(12 feet long, cut into 5 shelves the width of the closet)
and I bought 20" deep brackets to go with it.


\


I also splurged a little and got the fast track system instead
of just getting the little brackets
 and support arms I was going to get.


With this system, you just hang the one bar at the top
of the closet and then the standards hang on it.
 (standards are the lengths of metal the brackets connect to) 
It looks like this....


My first plan was to use my handy dandy
stud finder and hang the bar on a stud...
but alas, I have a studless closet!
This is stud finder for those of you that
have studs.
:)


Since there were no studs,
 I opted to use these molly anchors instead.....


If you've never used these, they are pretty simple,
you just unscrew the screw from the anchor bracket part,
 put it through the hole of whatever you're
wanting to hang. Screw the anchor back on like above,
then drill a hole in the wall that the anchor will fit into
when it's pinched like this.


Then you just screw the screws in until it gets tight like this...


The anchors get tight against the inside of your drywall and hold
a pretty good amount of weight!


Then it was time to hook on the standards
like this....


Next we used regular wall anchors to
anchor the standards to the wall.
(again, no studs)
:-/


I had a little help with this step..
I got my little man involved in helping
me screw the screws in....
I think he enjoyed himself!


Next was the fun part!
We put in the shelving brackets and
attached the wire shelves!
Easy as falling off a log!


Next I organized the sheets by size
and put them neatly on the shelves!


I always put my fitted sheet and
pillow cases folded inside the flat sheet...
the whole set is together and it
looks so much neater on the shelf.


Can you tell which side is the teenagers sheets and which side
belongs to the nine year old?
:0)


I decided to make these cute little tags to
further organize the space.


My Cricut Expresion to the rescue!!


So, there ya have it...
a nice, neat space that utilizes every
square inch of the closet!
I was able to fit everything from the old
storage system into this closet
with shelves to spare!


So just for fun,
here's the before and after one more time!


On Friday I'll be linking up to Traci @ Beneath My Heart
(she's having an organize your heart and home linky party,
so go link up your organization projects
there and here!!)

Domestically Speaking's Organizational Party
Thrifty Decor Chick's Before and After

Have a GREAT day
Hugs
Missy


Friday, January 7, 2011

Good and Perfect!

We've had an interesting few days, to say the least!
Bear with me as you read this long and sometimes boring post
to see how amazing our God really is!
(just stick with me till the end..K?)
:)

On Sunday while we were sitting down to dinner,
we noticed our lights
kept flickering and the flicker was accompanied
by an odd buzzing sound.

Hmmmm....what on earth could that be!

We walked over to the electrical panel, trying to see if something
was trying to overload a breaker, but the buzzing wasn't coming from there.

We kept walking around the house trying to figure out what the deal was, when I finally put my ear against the
window to the side of the house.
Aha!
It was the heat pump unit outside making the noise.


Oh great, we have heat issues, but wait, why isn't it cold inside?
(can you say emergency heat strip?)
Yikes!
Our heat pump was NOT working and we were running on the
emergency heat)


I ended up calling a local place here in town and they said, "oh that doesn't sound good, it can only be one of two things...a capacitor or a compressor. So they send a technician over and he was
here about 15 minutes and said, "you guys have a locked up compressor AND a blockage in your copper tubing. OK..great, more than I bargained for~! I asked him about replacing the compressor and he said he didn't think it was a good idea because
if the tubing was blocked it would just tear up the new $1,900 compressor!

How much, did you say?!
$1,900.00!!

It got worse!
Since they didn't think it would be wise
to replace the compressor, they said we would have to replace the whole unit...
the outside one AND the inside one!
Why both?
The government's enacted
all these goofy new rules about what kinds of
heat pumps you can put in your home now, and
apparently mine will be obsolete, so we can't just
replace the outside heat pump.
It's 7 years old...how obsolete can it be?!

Anyway, I asked the guy how much
THAT was going to cost us....

Are you sitting down??

Seriously, sit down!

He hands me a piece of paper with estimates
that range from $5,300 to $8,100..
yes folks, that's in dollars!

He left and I cried.
(and cried and cried...
then posted on facebook and twitter and cried some more!)
I mean seriously, who has thousands of
dollars just laying around the house?
Not me!
We were going to have to take out a loan!
UGH!

I finally quit crying and started praying!
(then had my church, fb and twitter friends praying..
thank you Rhoda, Layla, Beth, Deborah,
Diedre, Elisha, Dawn and of course mom...
bless your hearts, you're good friends!)
Why do we do that...get all upset and THEN pray?
Human nature I guess...
I suppose I still have some growing to do.

Anyway, to make this already long post a little longer..
I was sitting at my desk and got a phone call,
from a friend I haven't talked to in 20 years!
He said his sister (thank you Ann!) saw what I had written on fb
and called him.

He said he could send a guy over to look at it
for me.  He told me the guys name and
I just about fell out of my chair......
it was the same guy I had tried to find
to begin with because he had fixed our system before
and I had lost his number.

He came over in about 2 hours
(that, in itself is a miracle...how long do you usually have to wait for a tech?! lol)
He walked outside..and without even
removing the cover off the system,
said, "there's your problem right there".
He was pointing to a wire inside the unit that had
rubbed up against another wire and shorted out.
He was able to fix the unit
in 15 minutes AND
it only cost me $59.00!
A simple little wire people!

How good is God?!

Oh, and I called the other place this morning
and, without being mean, got the charges for the first
call removed.

James 1:17
Every good and perfect gift is from
above, coming down from the Father.....


What has God done in your life lately?
I'm just blown away by HIS goodness!

Hugs to you all
and sorry this post was SO long,
but I HAD to share!

Missy

Wednesday, January 5, 2011

We got a new...........


WELCOME to Treasures and Trinkets Linky party where you
can link up something you love, collect or whatever!
It's totally up to you!
No rules...just have fun!
Now on to the post!!


We have an addition to our family,
and NO it's not more kids!
LOL

We bought a new....


CHAIR!!
Woo hoo!
Isn't it just lovely!
:0)


I LOVE TJ Maxx!!!
We go this baby for $380.00 WITH tax!
I found the exact chair on Lane's website
for $699.00!
(yep, that a pic of it right there!)

(how much do I LOVE to save money!)

Our chair is actually my hubbies birthday present.
(very early, his bday's not till March)
:)
We've been searching for a recliner that didn't look like
an overstuffed marshmallow for a while now.
You know, a recliner that doesn't
look like a recliner.

This one has beautiful carved,
tapered legs and a lovely chenille fabric
that just beckons you to sit on it!
(only my hubby says it's his...but what
he doesn't know while he's at work doesn't hurt him)
;0)


Love that the dark wood tones
match the ones on our sofa legs too!
(just a great big bonus!)


Here's our sofa too...we got it a couple of
years ago with income tax money...
oh how I love income tax returns!!


I did some re-arranging of furniture when the recliner came
into the house.
See the chair over in front of the window??...
it used to sit where the recliner is now.


I think it looks much better in front of the window,
and it's a good thing too, the recliner won't recline over there! lol
(ignore my naked mantel....I'm trying to figure out what I want to do
after removing Christmas decorations) :)


Here's the view from the kitchen  now that it's
all freshly re-arranged.....


Here's the view into the kitchen area....


But here's the view that makes me
the happiest....


He REALLY Loves his new chair!
:0)

What have you guys been up to lately?
Have you found any great bargains you want
to share, something you've made,
anything you love?
Just link em' up!

Hugs
Missy


Monday, January 3, 2011

Let's Get Organized!


Happy New Year!

Hope we're all starting this new year off right!

I have decided to try to get more organized and less cluttered in the new year
and I'm going to be joining
Traci at Beneath My Heart
in her new series

Organizing Your Heart and Home 2011


Traci will be tackling a part of her home each Monday
in the month of January and we're all invited
to link up too!

I know there are areas in each of our homes
that we would just as soon not look at,
but I NEED to get some of these done
so I feel more peaceful inside!

The schedule will be as follows:

Monday, Jan 10-organizing your closet..
Traci will share her organized closet,
but on Friday Jan 14, we link up our own closet re-do. 

Monday, January 17 is Traci Organizing her kitchen
Friday, January 21st will be the linky party to share our kitchens

Monday, January 24th Traci will show us her organized bathroom,
but on Friday, January 28th we can link up over there and show her ours.!

Monday, January 31st she will reveal her new laundry room
and Friday Feb 4th, we can link up with our laundry room makeovers.

One winner will be chosen from each category for a giveaway!

I'm sure I won't be able to link up for each
one of these areas, but I'm sure I have at least one
or two!
So don't forget to scoot on over to Traci's blog and
link up your organizational skills!

You can read more about the whole thing at
Her sweet sister is also participating
but she will be handling the how to organize
your heart in 2011.
Let's show these ladies some love
and link up to the party!

Now let's get busy
organizing our castles!

Hugs
Missy


Related Posts Plugin for WordPress, Blogger...