Tuesday, May 8, 2012

Where I Put My Painting…

You all remember the lovely painting my friend Cindy painted me as a surprise?  Well, I finally figured out where I like it best.

rose oil painting

I placed it in my kitchen window, in front of my stained glass and under my chandelier.  I thought since I spend so much time in the kitchen, it would be a perfect place, and it is….I smile every time I go in the kitchen now.

oil painting

Isn’t she lovely?! My kitchen wallpaper has the same pink/blush tones as the painting. I can’t tell you what it meant to me when I received this precious painting in the mail.  Do you know Cindy went through my blog looking at my house so she’d know what colors would match!  She is SO thoughtful!

rose oil painting

So thanks again Cindy for my sweet little painting….she looks like she’s always belonged in my kitchen. :O)

chandeliers in the kitchen

I would like to frame her….but I’ve never framed a real painting on canvas before. Does anyone know how you do that?

I’ll soon have an update on my window seat! 
HINT: I finally have it to the point where I can sit on it!   Yay!

Have a blessed week!

Missy

Tuesday, May 1, 2012

Tea at Two

tea party

Hey everyone! I wanted to show you some pictures of our ladies tea we had at our church on Saturday, April 20th.  Six ladies from our church, including myself, each took a table as a hostess. We decorated with real china, silver, flowers, linens etc.  This is my table……

tea party ideas

how to have a tea


The china I used for my table was my mom’s, she gave it to me as a family heirloom.  Both my grandfathers (her dad and my dad’s father) got the entire set for her by filling their cars with gasoline. Each time they got gas, they received pieces of the china.  I think that’s so cool that gas stations gave away fine china!  Too bad we don’t have anything like that anymore. :0)  I have every piece of that china you can imagine…..teapot, sugar, creamer, gravy boat, 24 piece place settings of plate, bread plate, cup and saucer, salad plate, berry bowl, soup bowl…..even down to vegetable bowls and salt and pepper shakers.  I imagine they bought a LOT of gas to get that many pieces of china!

tea party ideas

The rest of these tables were the other ladies….it was such a wonderful day! We had scones, cucumber sandwiches, beef and Swiss on rye, chicken salad in phyllo cups, cookies,  little cheesecakes, clotted cream, lemon curd, candy, tea and punch.

tea party


This table is my mom’s….she had a Victorian theme.  Pink roses, pearls, and cameos.  So pretty!

tea party ideas

victorian tea


I love all the pinks and pastels that were used to decorate.  Each table was so lovely.

tea party ideas

The table with the peacock was our Junior Hostess table.  We had a sweet group of teenage girls from our church act as hostesses for each table…they were in charge of filling teacups, glasses and making sure we had plenty of food on the plates at all times.  They did a great job!

ladies tea

Hope you enjoy looking at the rest of the photos….we had such a great time!

how to have a tea

tea party food

how to have a tea party

how to have a tea

having a tea

foods to have at a tea party

tea for two

Have a great day!

Missy :0)

Thursday, April 19, 2012

Window seat update…

window seat


I’ve got an update on my window seat for you guys! :0)  In the above picture you can see the big gap to the left of glass front cabinet. (it’s kind of hiding behind those tubs, but look close and you can see there’s 4” gap)  I knew I would have to put a spacer in there, so I cut a 2 x 4 the height from the floor to the ceiling.  I removed the toe molding on that wall too.  
See……

how to install a spacer


Since you’ll never see the back of the 2 x 4  I decided to use L-brackets to attach it the wall. I was very lucky and hit a stud, if I hadn’t hit a stud, I would’ve had to use some drywall anchors. I used 4 L-brackets up and down the piece of wood….it needed to be super sturdy!  I used a level to make sure it was nice and straight too!

how to install L brackets


I put the cabinet back in it’s place and screwed it from the inside of the cabinet into the side of the 2 x 4.  I’ll eventually show you why I put the 2 x 4 all the way to the ceiling…there’s a method to my madness! lol


how to build a window seat


Here’s a picture a little closer up….you see I’ll have to caulk the crack, but at least the big gap is gone now.  :0)

how to build a window seat

I put a spacer on the other side too, but I didn’t figure you needed to see it twice! lol

I’ll show you how I’m going to fix the big hole here next! It’s not going to have that big sharp point sticking out either….that’ll be cut off at an angle.

how it install a spacer for cabinets

It’s coming together….slowly, but surely!

I bought a BUNCH of fabrics for curtains, pillows etc. that I want to show you soon….I need opinions!  :0)

Hope you guys have a blessed week!

Missy

Tuesday, April 10, 2012

Tea Towel Review and a God Thing…

Keep Calm and Carry On

Recently I was asked if I’d be interested in reviewing some tea towels from www.all-tea-towels.co.uk    After looking over all the adorable tea towels on the website I chose two really cute  ones to review.  Of course I had to pick a pretty pink floral one…..

pink dish towel

See how pretty the flowers are!

www.all-tea-towels.co.uk

I also picked one out for my hubby’s birthday!  You see, he’s a drummer and he carries a towel with him to dust off his drums, or even wipe a sweaty brow from time to time! lol  I got him this one, and there’s a story that goes along with it too! (Please read the whole thing…it was SO cool how this happened!)

keep calm and carry on

See, my hubby had seen the saying, “Keep Calm and Carry On” on a poster one day while we were in a craft store. (and yes, he does take me to craft stores…I’m a lucky lady!)  He said he REALLY liked that saying on the poster and I kind of tucked that away in my brain.  To make a long story short when I was approached to do this review by www.all-tea-towels.co.uk, I saw this adorable tea towel and got it for him as a surprise for his b-day and hid it away for a while. This is where the story gets interesting…..he is the worship pastor at our church and our senior pastor was going to be out of town and asked him to preach.  This was the very first time he would preach so we were pretty excited about it!   He had a whole week to prepare and I didn’t bug him about what he was going to preach, or even ask…I didn’t want to make him nervous.  He was to preach on Sunday night and on that Sunday morning I got the bulletin that announced what would be taking place for the day…it announced my hubby would be preaching and the name of his sermon was “Keep Calm and Carry On”!! When we got home I told him I had something for him…I gave him the tea towel and we both knew at that moment that it was a confirmation from God that he was indeed supposed to preach that message, on that very day, you see it has been months since he had seen that poster!  How cool is that?  I love it when God talks to us like that. :0)  Oh, and he did a marvelous job preaching too! His entire sermon was Keep Calm, Carry On…You are not alone.  (saying God is always with us…even in the midst of our storms)

So these tea towels are not only beautiful and sturdy, but this one in particular was a gift from God. (and www.all-tea-towels.co.uk )  :0)  If you’re in the market for some really lovely towels, that have held up wonderfully for me, I would recommend you go over and look at the tea towels on this site.  I had a hard time choosing because there are oodles of great ones to pick from!

I had a hard time not getting this one…isn’t she lovely!

www.all-tea-towels.co.uk

AND this one!

www.all-tea-towels.co.uk

These are very well made too…see the hems..

www.all-tea-towels.co.uk

I have my pink floral one hanging in my kitchen.  I received the towels a while back, but asked if I could wait a couple of weeks so I could do an honest review….they were happy to oblige me. 

So this is my honest review…I adore my tea towels and wouldn’t hesitate to purchase more!

Here’s the website again if you’d like to go take a look!
www.all-tea-towels.co.uk

Hope you all have a blessed day!
I have another update on my window seat…I’ll post it soon!

Hugs

Missy

Friday, April 6, 2012

We Will Remember….

Jesus

Let’s remember what this day is all about…. never forget the price HE paid.

Blessings

Missy

Technorati Tags: ,,

Tuesday, March 27, 2012

How to Build Raised Planter Beds

how to build raised beds 
Hey everyone! I thought you all might like to see how I made the raised planter beds in our back yard. I did this as a guest post for Gail, at My Repurposed Life, a while back and never did put it on my own blog, so here we go! :0)

When we moved into our home, I soon discovered our back yard is pretty much one big rock pile, so I decided raised beds would be our best bet for pretty flowers and vegetables. (see,  just look at all those rocks we dug out!)  YIKES!

plans for raised beds
 
I started off by measuring how big I wanted our beds to be.  A good rule of thumb is not to make them any wider than 4 feet so you can reach in and work in the middle without having to climb into the beds. (I didn’t follow that rule, cause I don’t mind getting a little dirt on my feet) :)
I used cedar for our project because it’s very rot resistant and we live in KY and get loads of rain and snow!   I bought 1 x 10 cedar boards  (which means 1” thick, by 10” wide) at my local home improvement store and began by laying them out where I wanted my planters to go, like this…….

how to build raised beds
(the rocks in this pic were from a rock wall planter that was already here…no doubt they dug the rocks out of the yard! lol....but we hauled them off.)
After I had all our boards laid out, I begin to assemble them. (you’ll determine your own size beds, that’s why I’m not giving you specific dimensions here)   First I screwed the two pieces of wood together from the side, then inserted a little piece of triangular shaped wood I cut out, and screwed into that too. It’s for extra stability. 

how to build raised flower beds

You can check to make sure the corners are square by putting a square (pictured below) on the outside corner and make sure there aren’t any gaps.  If there are, you just adjust until it’s nice and square.  Or you can also measure from one corner of your planter, to the  other corner diagonally, then do the same thing the other way, until the measurements are the same.   This will also help you make sure it’s nice and square and cheaper than buying this tool….


One stretch of my raised bed was going to be over 20 feet, so I had to splice two pieces together because the boards didn’t come in pieces that long.  I just took a scrap of wood  4” wide, and put it in the center where the two boards were going to go together and screwed them to one another like this…..

raised beds

That splice will later become a pretty little “column” detail on the finished piece.   I added another scrap to the back for extra stability like this……..

how to build raised beds

On the outside corners I took some more scrap cedar and built some more “column” details.  I wanted the columns to be 4” wide, so I cut one board (the one on the left) at 4”, but made the second one (on the right) 3” because I had to take the 1” thickness of the other board into account. So if you measure either way on the outside corner, it comes up to 4” wide columns.
See….
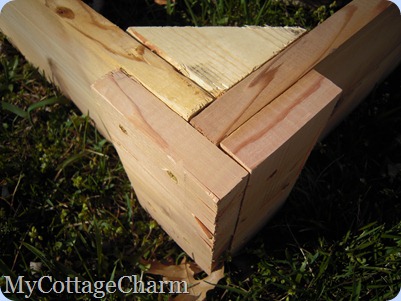
raised planter beds

In this picture, you can see where I just cut little 6” square blocks of wood and capped off the little column detail….

raised flower beds

Here’s the center column where I spliced the two 10 foot boards together to get our 20 foot bed.  I also installed a little cap on this column too….. I did the caps on all the corners of the planters.
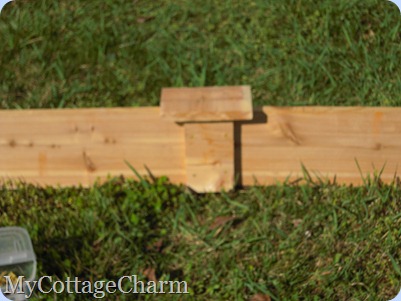

how to build raised beds
 
I then painted all the raised planter beds with primer and a good exterior semi gloss paint to help protect the cedar even more.  By the way, cedar has a smooth side and a rough side, I used the smooth side on the outside of the boxes.

how to build raised vegetable beds

To anchor the beds in place, I used some scrap pieces of  wood and cut a point on one end like an arrow, and pounded then into the ground  on the inside edge of the planter.  Then I screwed the planter sides to the anchors.  You can see the tops of the anchor pieces of wood in the picture below.   After I had them all anchored down, I put down a THICK layer of newspapers,  (or you could use landscaping fabric) to kill the grass and put in a mixture of topsoil and compost I got from my local nursery. 
Then you’re all ready to plant! This project wasn’t hard at all, just a little time consuming.  I think it took a couple of days to build three large planters….not too bad!

how to build raised beds

That’s it!  I hope you enjoyed the tutorial on how to make raised planter beds!
Blessings!
Missy
My Cottage Charm

Thursday, March 15, 2012

Window Seat …..the Beginning.

Hi everyone!  I thought you all might like see what I’ve done on my window seat so far.

Here’s where I started…..a very formal dining room.  Don’t get me wrong, it’s okay, but I’m kinda tired of it being so formal.  Can’t you just see a nice long window seat in front of the three windows there on the end? I can’t wait to snuggle up and look through my favorite magazines while curled up there! :0)  (or even better…reading books with my kiddo!)

dining room makeover


The first thing I did was to take down the curtains and move out the furniture on that end.  Then I put together the Billy bookcases I got from IKEA and set them in place.  Don’t you just LOVE the glass doors? I’m in love! (yes, I’m already trying to see how things will look all decorated…did you expect any less from me?!) :0)

how to build a window seat

 
I measured and marked the center of the window, then the center of the set of old drawers and lined up the marks so they would be centered under the window. I wanted to get an idea of where everything would sit when I put it all in. Here’s a first look where everything will end up sitting….(and yes, I know there are gaping holes on each side of the drawers..trust me, I’ll fix that, this is just for placement purposes) :0)

how to build a window seat

The drawers weren’t deep enough to set completely against the wall and make them the depth I wanted, I just pulled them out where I wanted them to sit, which was about about 8” from the wall.  It’ll be ok because the top will be screwed down to the fronts of the drawers and into the ledger I installed on the wall. 

Here’s how I built the ledger.……

how to install a ledger board

I took some 2 x 4’s and screwed them into the studs in the walls with some REALLY long screws….because of the lip of the window sill that happened to be the depth of the first 2 x 4 that I installed,  I ended up layering a 2 x 4 on top of the first one…screwing it into the first one.  I put the double 2 x 4’s the length of where the window seat would be.
This is where the wood, that I’ll be making the top of the window seat out of, will be screwed into.  

how to build a window seat


Here’s a piece of scrap wood that shows how the top of the  window seat will sit on the ledger board.  See how far out the drawers come away from the wall…you can see that you don’t have to have the exact depth of a window seat to make a piece work….just pull it out and put in a ledger board.  You could just as easily use the short kitchen cabinets that go over your fridge…but you’d probably have to throw some 2 x 4’s together to build a base for a little extra height.

window seat

Well, that’s all I have today!  I’ll try to get some more done on in it in the next week or so…I’ve had this crazy congestion and fever for a few days now and I’m hoping it’ll be gone soon so I can get something done around here!  It probably has something to do with 5” of snow about a week ago and now it’s almost 80…we have some really CRAZY weather here in KY!   This is NOT normal for March! (but I’d be enjoying it if I weren’t sitting in bed sick!)

Ya’ll have a great day!

Missy

Related Posts Plugin for WordPress, Blogger...