Wednesday, March 14, 2012

Sorry

Just wanted to let you all know where I’ve been.  My poor computer has been dead in the water the past few days…my power cord fried and I’ve been waiting on my new one to come in….as you probably guessed, it came in today. Yay! :0)

I’ve had so much I wanted to tell you, but I couldn’t because I couldn’t exactly write a post on my phone! lol

I’ll do a post tomorrow to show you where I am on my dining room window seat….it’s a little slow going because I’m sick.  I have a fever of 100.6, congestion and just lethargic.  Hopefully I’ll feel better by tomorrow and can get that post up for you all.  I’d appreciate your prayers…I don’t like being sick, I have to much to do!

Hugs
Missy

Wednesday, March 7, 2012

Guest Post from Amy at Mod Podge Rocks..

Hey Everyone, I’m so excited that Amy, from Mod Podge Rocks, is guest posting here today! Amy has an awesome blog with so many craft and DIY projects it’ll make your head spin! (in a good way!)  Let’s see what she has for us today……here’s AMY!!

This is Amy from Mod Podge Rocks, so pleased to be here today!
I have been blogging for almost four years at MPR, and I am (as you can guess) addicted to crafts and DIY. I love creating, but I also love writing. I co-own Decor Hacks with Heather Mann, and I contribute to Babble.com's The New Home Ec .  Not to mention that I have a new book coming out this June called Mod Podge Rocks. You could say I keep busy.

I hope you enjoy my photo block. I made it with bright colors and papers because that's what I like, but you can customize it to fit your decor. Here's how I made it!

mod podge rocks

I love capturing memories through photographs, and I particularly like interesting ways of displaying them.  Regular frames are nice, but photo memory blocks add a wonderful touch to your home décor – and you can get very crafty with them!  Consider using a photo memory block to decorate your child’s room or you desk at work.  Here’s how I made mine.

Wood Memory Block – mine is a 6” square
FolkArt Acrylic Paint, coordinating colors – I used Lemon Custard, Hot Pink and Yellow Citron
Mod Podge Matte, 8 oz.
Scrapbook paper, 1 sheet per canvas – I used K & Company’s Berry Sweet papers
Embellishments – I used K & Company’s Berry Sweet collection, as well as a few buttons, paper flowers and rhinestones from my stash
Craft Glue
Flat Paint Brush
Craft Knife and Mat or Scissors
Ruler

mod podge rocks

Start by trimming your paper to fit the sides of your wood block.  My craft mat has a ruler guide so I was able to quickly measure and cut a 5 1/2" square – I wanted to leave a 1/4" border around all side of the paper so that I could see the paint.  I cut six squares out of three sheets of paper, choosing coordinating papers so that they would look good together.
mod podge rocks

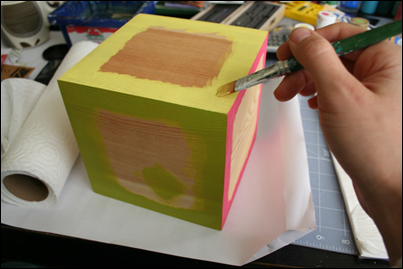
Paint your block with the acrylic paint and flat paint brush.  You don’t have to paint the entire side of the block since you’ll be applying paper over it; just paint the edges.  I applied three coats to each side.  Allow to dry.

mod podge rocks

Now that your wood block is dry, apply the Mod Podge.  Use a medium layer and coat well. Apply the paper to the center of the block and smooth it down thoroughly with your fingers or a brayer.  If Mod Podge comes out the sides, that is fine – simply wipe it away with your brush.  Apply the papers to all sides of the block and allow to dry for 15 – 20 minutes. 

TIP: I applied Mod Podge to the corners and edges of my paper before smoothing down – this helps since the edges are the first thing to dry!

mod podge rocks

Next add a coat of Mod Podge on top of the paper.  Allow to dry and add a second coat, covering the whole block.  The fun part is next!

mod podge rocks

mod podge rocks

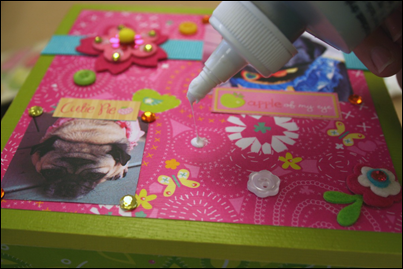
Now add the images and embellishments with craft glue.  Get creative!  I planned my picture sizes first and printed them all out before I glued anything down.  You don’t have to fill the entire block with one photo; check this finished side out:
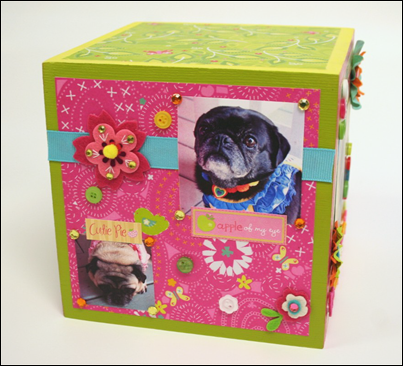
mod podge rocks

You can also do a few photos on one side and add embellishments around them.  I had so much fun!  Here’s another finished side:

mod podge

Add photos and embellishments to all sides, except for the bottom and the top (unless you want to).  Now I have something for my desk at work to remind me of my sweet dogs when they are at home and I’m in front of the computer.

Thank you Missy, for having me today! Please feel free to visit me at Mod Podge Rocks anytime, or follow me on Facebook  or
Pinterest

Have a great day!
Amy

THANKS Amy for sharing such a great craft with us, it was such a treat to have you on My Cottage Charm! Why don’t you guys go over and check out some of Amy’s other crafts on her fabulous blog, Mod Podge Rocks
Missy

Thursday, March 1, 2012

Houzz.com Featured My Kitchen…

I received a nice email yesterday from Houzz.com letting me know that they used my kitchen in one of their idea books.  Here’s the idea book…my kitchen is the 6th…the cottage kitchen with the tin backsplash.  :0)  How fun!

Enjoy your day!

Missy

Saturday, February 25, 2012

Window Seat Begins…

The chaos has begun and the work has started on my built-in window seat!

I did some figuring and got all the measurements for everything I would need to make this….

how to build a window seat

I made a nice discovery! See those cabinets on each side of the window seat?  I found some pre-made bookcases from Ikea that will fit those areas almost perfectly, so I don’t have to build that part! woo hoo! 

Here are the bookcases

billybookcase IKEA

The Billy bookcases were only $39.99 each and their dimensions are:
Width: 15 3/4 "
Depth: 11 "
Height: 79 1/2 "

They’re gonna work great! I will have to put a spacer on the left one by the wall, but I would have had to do that even if I had built the cabinets myself because the spaces on each side of the windows aren’t exactly the same.  We were REALLY blessed to find some Billy doors with glass fronts on clearance because they weren’t going to carry these particular doors anymore.   We got both door fronts for $68.00.  They look like this….
(sorry it’s blurry, I had to find one on the internet because I don’t have mine out yet)

billy bookcases IKEA

I can’t wait to get everything going~!  I’ve been taking down curtains, pulling out baseboards and just getting ready to start some of the building.   I thought I’d show you the cabinets we found though…that was a real blessing!  MUCH less building for me!

I’m going to be putting in a ledger board next…that’s the board you screw to the wall to help hold the top of the window seat and to carry the weight that will be put on the seat.   Hopefully I’ll get to start on that one day this week.  

Life is crazy busy around here as usual, but I’m still blessed as always! :0)

So what do you all think about my find….do you like them and have you ever used Billy bookcases from Ikea before?

Have a blessed day!
Missy

Tuesday, February 14, 2012

Happy Anniversary and Happy Valentines Day!

Hey everyone!  Guess what?!….

happy v day 
Today my hubby and I are celebrating our 27th anniversary!  Yep, we were married on Valentines Day 27 years ago today!  I was 17 and he was 19…and no we didn’t “have” to get married, we were just head over heels in love.  :0) 
Our wedding day was one I’ll never forget!   First off, my poor hubby-to-be had to work…his boss wouldn’t let him off for his own wedding day….who does that to a person??!!  To top that off, he was SICK…I mean really sick….he had a fever and everything. He was so sick, his groomsmen had to dress him! 
Surprised smile
So you’re probably thinking it couldn’t get any worse right?  WRONG! 

snow storm
We got a HUGE snow storm…I’m talking over a foot and had to send 4 wheel drive vehicles out to pick up people in our bridal party.   

We finally got everyone to the church (and unbelievably had a good turn out in the pews too) and got it all underway.   My love was up front waiting for me, and my daddy walked me down the aisle.  You’d think everything would have been smooth sailing from there on out wouldn’t you?  Nope, not exactly.  I’m a singer, so I sang  the song, “You are flesh of my flesh” to my honey and someone was supposed to hit the record button so we’d have this precious moment in our lives on tape….but did they? Nope…we have no audio or video of our beautiful day….hope he was listening good to me singing, cause it was a one time deal!  lol       (if you’d like to hear the song, go HERE and click on the first song)

We were also supposed to have someone fill our glass up with grape juice so we could take our first communion together, but they forgot, so we had to “pretend” to drink the juice, cause the glass was empty! Oh well!

glass

Then there was the kiss. (this is a good part of the wedding!)  :0) 
Apparently, according to our pastor at the time, the stage got about 15 degrees hotter when I laid THE kiss on my honey! 
(This isn’t our wedding pic, but I’m thinking it was something like this……you know, fireworks and all!) :0)

the kiss
Our pastor said of everyone he’s ever married we still hold the #1 spot for the best kiss!!  He’s performed a LOT of weddings…including his own kids, and we still hold the top spot!  I think we need some kind of trophy for that don’t you?! lol   OH…our pastor was also performing our wedding on his anniversary. He and his wife were married on valentines day as well!

The wedding was finally finished and everything that could have gone wrong, pretty much did, but we were still married….and were were over the moon happy!  We were supposed to go south to a nice little place in TN for our honey moon, but the roads were impassable so we had to spend our honeymoon in Northern KY in a Holiday Inn!  Some day we’ll have a real honeymoon to make up for what we didn’t get then, but even if we don’t, we’re still married and we’re still happy as larks.  This just goes to show you that even when things seem tumultuous and aren’t going quite right in the moment, they can still turn out beautiful in the end.   It’s kind of like that with life too.  You may be going through some terrible things right now, but God sees the big picture and knows the outcome.  We only see the back of the needlepoint picture of life….the knots and the hanging threads, but God is using all those moments in our lives…good and bad, to weave a beautiful piece of artwork.  He sees the finished side….he sees the beauty.  We just have to trust him and know that “all things work together for good to those that love the Lord”.  Romans 8:28.


So, I’d like to take this moment in time  to wish my beautiful and loving husband a happy 27th anniversary! I can’t wait to spend the rest of my life making new memories with you!

true love

Blessings
Missy

PS…I forgot to tell you…I hadn’t eaten anything all day the day of our wedding except the bite of cake at the reception, so I was starving!! We arrived at our hotel at 10:05…..room service closed at 10:00 and TJ was too sick to drive to get me anything and I couldn’t drive a stick shift…. I called my mom to say hey….they were eating hot pizza. 

Par for the course. Smile

Friday, February 10, 2012

I Have a Plan……

Hey everyone!  Here’s the plan I drew up for my dining room wall where I’ll be turning this……

how to build a window seat

into this…..

how to build a window seat

A window seat with china cabinets on each side!!

Ok…just imagine my windows inserted under that arch and I drew too many drawers, but you get the idea.   I’m going to build it on this wall…

how to build a window seat

The top edge of the arched piece will sit right under the soffits on each side of the room so it will make a shelf across the top…where the top edge of the curtains are now.  

This is a BIG project, but I think it’s gonna be great when it’s all done.  I can’t wait to get it completely finished, then I’ll start on the sewing.  There’s going to be a LOT of sewing involved…at least I think there will be, cause I’ll be making curtains, pillows etc.  I think I’m going to incorporate the fabric I used to reupholster these chairs in there.  If you’d like to see how I upholstered these chairs click HERE.

How to upholster a chair

Ok, so that’s what the old set of drawers are going to be.
What do you all think….any ideas or suggestions for window treatments or anything else?  I’d love to hear your ideas!

Have a great weekend!!!

Hugs
Missy

Saturday, February 4, 2012

One More Guess….

Hey ya’ll! 

We’ve been on vacation this week, well actually it was a “Staycation” cause we didn’t go anywhere…..hence no blog posts for a few days! :0) We were going to drive over to Charleston, SC, but decided we’d just like to stay home and relax around here.  Do you ever come back from vacation more tired than when you left?   Well that’s what we didn’t want to happen because my hubby is starting a new job on Monday and he needs to be relaxed and feeling fresh!  :0)   We did do a lot of day trips and ate out more times than I care to mention….I’m actually looking forward to cooking this week! (and those that know me well, will know that’s saying something!)

You remember my last post when I showed you these?…

how to build a window seat

I asked you what you thought I was going to do with them…..well, I thought I’d show you a picture of where they’re going to go and see if you can figure out what I’m going to do with them now! :0)

This is my dining room….a little too formal for me, so I’m going to be changing it up a bit.  Ok…see the BIG three window expanse? Well guess what I’m going to be doing there…..and yes, it involves those drawers! :0)  Bet you can figure it out now!

how to build a window seat


Here’s a view from the end of my dining room table…

window seats

Ok…now can you guess what I’m going to be doing with those drawers? :0) 

It’s definitely going to require building and power tools!  lol  So now do you know what I’m gonna build?  I’m SO excited about getting this all done!!  woo hoo!

later taters!

Missy

Related Posts Plugin for WordPress, Blogger...